Please enable JavaScript to view this site.
There are two ways of creating a Barcode. You may wish to convert data from your spooled file page into a barcode or add a static barcode to your output. In both cases you need to select the Barcode icon  , or press -.
If you wish to select data from your spooled file then select the data from the input pane that you wish to include in your barcode. Click on the barcode on your Output pane and drag it to the required position. Now right click on the barcode and select Properties. On the General tab enter a description for your barcode, and then select the Barcode tab and Settings.
To create a static barcode (one that is not generated from data on your spooled file) select the Barcode tool, click on the Output pane and, using your mouse, drag the tool to the required size. Now enter a description on the Description tab and select the Barcode tab. Click on the radio button ‘Data’ and enter the value for the barcode in the box provided. The Settings for the type of barcode required are selected in the same way as when creating a barcode from data on your spooled file.
You may also select Barcode Element from the Insert menu.
Notes:
•The data in CPPD on the IBM i is EBCDIC but the data in the barcode is ASCII; so a translation is required. IBM converts the EBCDIC data to ASCII when it creates the barcode and it uses this table https://www.ibm.com/docs/en/iis/11.7?topic=tables-ebcdic-ascii. If you need to add a specific ASCII character to your barcode, look up the EBCIDIC equivalent in the table and use COBHEX to generate the correct EBCDIC character. This will then be converted to the desired ASCII in the barcode.
•When adding the barcode output in the Cobwebb Designer it is recommended to set the barcode length to the maximum length required and tick "Trim trailing blanks" in the barcode Settings.
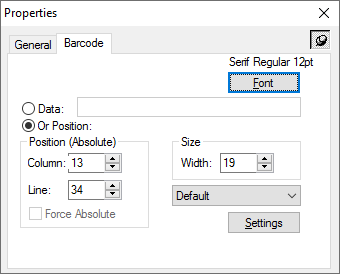
Barcode Properties
See General Properties for details on the General tab.

Font
Enables altering of the elements font in the output document by bringing up the Font dialog box. This font will be applied to the barcode text if you have checked the Print Text entry in the Barcode Settings.
Data
If you wish to enter static data to generate your barcode then select the Data radio button and enter the information in the box provided. Please note that there is a limit of 132 characters in this Data entry; if you require more i.e. for a 2D barcode, then please refer to the topic Populating 2D barcode with more than 132 characters for details.
Position (Absolute)
If you wish to select data from your spooled file then select the Or Position radio button and the following entries are enabled.
Column
The horizontal position of the element in the input document.
Line
The vertical position of the element in the input document.
Force Absolute
When checked, forces the element to be positioned absolutely in the input document. See Absolute and Relative positioning for further details.
Size
Width
The width of the element in the input document in grid size units.
Settings
If you have already created a Barcode Settings entry then select it from the list or click on the Settings button to define a new set of Barcode Settings.
